Feeds:
Posts
Comments

Archive for October, 2010

done 2

I am a chocolate lover.  It is rare that I’d pick a dessert on a menu that doesn’t have chocolate (it would have to be an extremely appealing warm fruit dessert option with ice cream).  However, I have to acknowledge that there are some people out there who don’t feel the same way, especially when I entertain.  The husband and I are planning a dinner party and I have a long list of desserts to include.  That list has been edited down from an even longer list, but it will probably be slightly overboard:-)  That is just how I do it.  Anyway, since I will be baking more than enough desserts for our friends, I realize I need to make sure that each dessert should serve its purpose with a unique set of flavors, textures and appearance.  When I flipped to the Gooey Caramel Butter Bars in my Sticky, Chewy, Messy, Gooey cookbook, I knew I had to make them.  Layers of shortbread cookie dough and creamy decadent caramel?  What else could a non-chocolate lover want?

cookbook

Luckily I found this recipe online so you can bake these at home.  It is always tough when I decide to bake from a cookbook because I know that I can’t reprint the recipe as is.  Luckily, someone else had it posted so you can refer there for measurement details.  I’ll point out the small changes I made to the original below.

These Gooey Caramel Butter Bars have several steps but are not difficult to make.  Just make sure you have a couple of hours because you need your crust to cool before layering on the caramel and topping.

For the shortbread you will need an entire pound of butter, granulated and confectioners’ sugars, vanilla, salt and all-purpose flour

shortbread ingred

You will need a sifter for your confectioners’ sugar

sift

I used my make-shift version from last time powdered sugar in sift sifted powdered sugar

Then you will beat together all of the butter, granulated sugar and sifted confectioners’ sugar

butter and sugars

Beat well until it is creamy and a little fluffy

mixture of butter and sugars

Beat in your vanilla and salt and then set aside

adding vanilla

Sift your flour as well

dry ingred

And then slowly add to the dough while mixer is on low

adding dry ingred 2

Combine just until a thick dough forms

dough 1

Now you will set aside 2/3 of your dough

dough on seran 1

Flatten it out on seran wrap

dough on seran 2

Wrap it up and refrigerate until you need it as a topping

dough on seran 3

Your other third of the shortbread dough will go into a 9×13 pan sprayed with cooking spray

dough in pan 1

Use your hands to flatten out the dough

dough in pan 2

Then bake at 325 for about 25 minutes, or until lightly golden brown around the edges; allow to cool on a rack prior to adding additional layers

baked crust

While the crust cools, it is time to make your caramel; you will need 1 bag of caramel candies, heavy whipping cream, vanilla, salt and the optional kick of dark rum (I used just a tablespoon and didn’t notice much effect on flavor)

caramel ingred

Put all of the ingredients in a microwave safe bowl

making caramel 1

And microwave the mixture for a minute, then small 30 second increments

making caramel 2

Stir in-between microwave sessions

making caramel 3

Your caramel will start to look like this

making caramel 4

And then more like this

making caramel 5

and this

making caramel 6

then this

making caramel 7

And then finally it will be smooth and creamy like this

making caramel 8

When the shortbread crust is cooled to room temperature and the caramel is ready, spread it onto the crust

caramel on crust

If you keep the caramel away from the edges, clean-up will be a lot easier

caramel on crust 2

My “secret” ingredient

sea salt

Sprinkle the sea salt lightly over caramel (next time I’ll use a little more than in the picture below)

salt on caramel

Now get the rest of the dough out of the refrigerator to top your bars

dough for top

Break it up into small pieces and pile them evenly on top of the caramel

dough on top

Then bake again for about 30 minutes, or until the top is lightly browned and the caramel is bubbling

baked

Cut and serve!

done

Notice that you can see the grease marks on the cutting board, these really are buttery but as a result, they melt in your mouth in a very delicious way.

Are you a chocolate lover? What is your favorite non-chocolate dessert?

Read Full Post »

Last weekend was very exciting, we celebrated the engagement of Adam and Sara (my brother-in-law and future sister-in-law)!  Lots of champagne was involved and of course I had to bake for the occasion.

The happy couple:

engagement 2

Me with the new member of the family:

engagement 7

Looks like Matt and I are now the old married couple of the group;-)

engagement 3

The celebration was just a few days after my father-in-law’s birthday so I made this cake for him.  For the new engaged couple, I made a personalized Ice Cream Brownie.  I was very excited when Adam decided to propose to Sara.  When I asked what Sara’s favorite dessert is, he said she loves brownies with ice cream.  It didn’t take me more than a minute to decide what to make.

This is a dessert I’ve made often in the past, but the flavors always change depending on who I am baking for.  The basics stay the same:  brownie bottom, hot fudge and oreos on top of that, then cool whip and an ice cream of choice.  Pretty easy and oh so delicious.  ALWAYS a big hit.

Like I’ve said in the past, when there are enough tasty ingredients, lower fat parts don’t take away from the final product.  These No Pudge brownies are perfect for this recipe.  They are chewy and chocolaty, even when frozen, but not too rich to layer in this dessert.

brownie ingred

Brownie mix + yogurt + stir = easy!

brownie mix and yogbrownie batter

Spread batter thinly in a 13 x 9 pan sprayed with cooking spraybrownie batter in pan

Bake for about 20 minutes, or until knife comes out cleanbrownie done

Next step- hot fudge and oreos

oreo and hot fudge

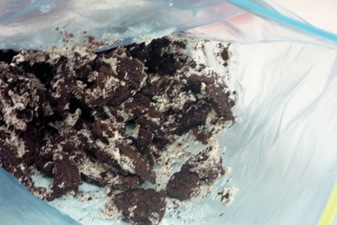
You can crush the oreos in a ziploc bag by hand while your brownie is baking

crushed oreo

Spread the brownie with hot fudge before it is completely cool, it will be very easy to spread that way

oreos on brownie 1

Then cover the hot fudge with a full layer of crushed oreos

oreos on brownie 2

Then cover this entire layer in cool whip

cool whip

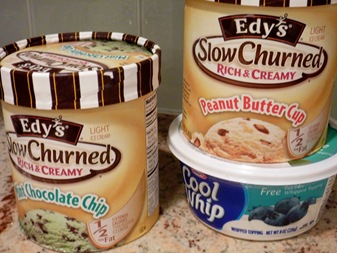
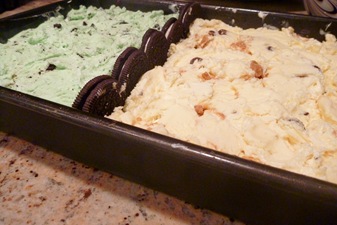
Since Adam and Sara have different favorite flavors that don’t really go together, mint and peanut butter, I spilt the dessert in half with a wall of oreos

cool whip on brownie 1

Once you have a full layer of cool whip, freeze the dessert for about a half hour

cool whip on brownie 2

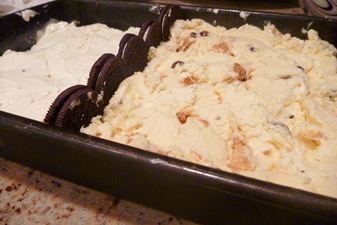
Next layer is ice cream

ice creamice cream on brownie 2

Spread your ice cream over the layer of cool whip

ice cream on brownie 1

While I was planning the dessert, I realized we might want a way to identify each side before digging in

reeses and pepp patties 1

Pepperment patties and peanut butter cups

pepp patties

reeses and pepp patties 2

Once all of the ice cream is covered in cool whip, sprinkle the corresponding candy flavors on each side

cool whip on ice cream

full ice cream brownie 1

And serve to the happy coupleengagement 10 inside of ice cream brownie 2 inside of ice cream brownie

Ice Cream Brownie

Adapted from the Original Baker

Serves 12, generously

Ingredients:

1 box No Pudge Brownie (or brownie mix of choice) and ingredients listed on box

1 cup hot fudge

12 oreos

4 8 ounce containers of cool whip, defrosted

1/2 gallon ice cream (or 1/2 container each of 2 different flavors), slightly softened

20 pieces chocolate candy

Directions:

Bake brownie in a 13×9 baking pan sprayed with cooking spray, following instructions on box; bake for about 20 minutes or until knife comes out clean

While brownie is baking, crush oreos in a ziploc bag and set aside

Allow brownie to cool for about 10 minutes and then spread full layer of hot fudge

Layer crushed oreos over hot fudge

Spread 3 of the 4 containers of cool whip over oreos

Freeze layered dessert for about 30 minutes, or until cool whip layer is firm

Chop candy pieces while dessert is in freezer and set aside

Spread ice cream over top of cool whip

Cover ice cream with a thin layer of cool whip using 4th container

Sprinkle candy pieces over cool whip

Serve immediately or cover baking pan with tightly foil and freeze until serving

Have you celebrated anyone’s engagement recently?

Read Full Post »

I usually really like the desserts I bake.  Sometimes I love them.  And then, every once and a while, I make something new that automatically climbs to my list of top desserts.  If this cake isn’t one of those, it sure is close.  And without a doubt, I WILL be making the ganache again, and soon!

When I saw this recipe, I knew I had to try it.  Coffee and banana together?  That was a flavor combination I had yet to try but was very intrigued.  I’ll tell you right now, I was not disappointed!  Make this Banana Cake with Mocha Ganache and you will not be either.

fully iced 1

This recipe is time consuming, but not very difficult if you have some baking experience.  I actually thought the ganache was much easier than the last time I made one (that could be because I was relaxed and not rushed, though).

This banana cake is worth trying, even if you already have a favorite go-to recipe.  The flavors are a little different with a richness from the coffee and the delicious scent of cinnamon.  This is what you need:

banana cake ingred

Pre-heat the oven to 350 degrees

Spray your cake pans with non-stick cooking spray and line the bottoms with parchment paper

baking pans for ban cake

You then need to sift your dry ingredients; I don’t have a sifter, so I improvised!

fake sifter 2

This worked out perfectly- goes to show you that you don’t need fancy tools to make delicious desserts

fake sifter

Sift all of your dry ingredients together

flour into sift

Flour, baking soda, baking powder, cinnamon and salt

dry ingred in sift

Then whisk the dry ingredients together and set aside

Next up, cream together the butter and sugar

butter sugar 1

Do it for a few minutes, until the mixture is light and fluffy

butter sugar 2

Then add the coffee grinds and vanilla

coffee and vanilla added

I’m telling you, this makes an excellent addition to the banana cake

coffee and vanilla mixed

Add in your eggs, one at a time

adding egg

Then add in the half the dry ingredients, banana, and sour cream, mixing between each addition

mashed ban

adding ban

Mix in the remaining dry ingredients just until combined; don’t overbeat

batter

Divide batter evenly between two 8 or 9-inch cake pans

batter in pans

Bake for ~30 minutes, or until lightly browned and a knife comes out clean

cake baked

Meanwhile, your ganache is made up of 3 simple ingredients:

ganache ingred

You can get started on this while your cake is in the oven

chopping chocolate

Chop up the chocolate, coarsely, and prepare extra-strong coffee

chopped choc

Slice up your butter and set aside

cut butter

Now set up your double boiler; bring water to a simmer

simmering water

Place heat-proof bowl over the pot

double broiler

Pour the coffee over your chocolate

coffee over ganache

Continuously stir until chocolate is melted and smooth

cooking ganache 1

Remove bowl from heat and whisk in the butter

cooking ganache 3

Your ganache will get very creamy

cooking ganache 4

Then allow ganache to cool, stirring occasionally

cooking ganache 2

You know it is ready when the mixture gets nice and thick

cooking ganache 5

Time to put together your cake!

Run a knife along the edges of each layer to loosen cake from the pans

knife around cake

Take your serving platter and put it over your bottom layer

plate over cake pan

Hold pan and platter together as you turn over the pan; the cake layer should come right out

cake on plate 1

Remove parchment paper; notice that the bottom of the cake is nice and flat which will work nicely for layering

cake on plate 2

icing 1st layer 1

Use a large spatula to spread the ganache

icing 1st layer 2

Cover the entire layer

icing 1st layer 3

Use the same methodology to flip your top layer onto a separate plate

flip layer 2

flip layer 2 2

flip layer 2 3

This way you will have the top layer right-side-up on the cake

flip layer 2 4

To ice the rest of the cake, pour generous amounts of ganache on top and then spread

icing 2nd layer 1

Be careful not to spread to thin, this will keep you from collecting crumbs on the outside of your frosting

icing 2nd layer 2

icing 2nd layer 3

Use up all the ganache, because you can never have too much frosting on a cake

empty icing bowl

Run the spatula gently around the sides of the cake to smooth out the edges

fully iced 2

Store cake at room temperature for up to three days

cake sliced 2 cake slice

Banana Cake with Mocha Ganache

Recipe from La Mia Vita Dolce, and originally from David Lebovitz

Serves 12-16

Ingredients:

Banana Cake

2 1/2 cups all-purpose flour

1 1/2 teaspoons ground cinnamon

1 1/2 teaspoons baking powder

3/4 teaspoon baking soda

1/2 teaspoon salt

1 cup (2 sticks) unsalted butter, softened

1 1/2 cups sugar

1 teaspoon vanilla

1 tablespoon instant coffee grinds

2 large eggs

6 tablespoons sour cream (I used reduced fat)

2 cups mashed ripe bananas (~5 medium bananas)

Ganache

10 ounces semi-sweet baking chocolate

1/2 cup extra-strong brewed coffee

10 tablespoons unsalted butter, softened

Directions:

Banana Cake

Pre-heat the oven to 350 degrees

Spray your cake pans with non-stick cooking spray and line the bottoms with parchment paper

Sift dry ingredients (flour, baking soda, baking powder, cinnamon and salt)

Then whisk the dry ingredients together and set aside

Cream together the butter and sugar for a few minutes, until the mixture is light and fluffy

Then add the coffee grinds and vanilla and mix

Add in your eggs, one at a time

Then add in the half the dry ingredients, banana, and sour cream, mixing between each addition

Mix in the remaining dry ingredients at low speed, just until combined; don’t overbeat

Divide batter evenly between two 8 or 9-inch cake pans

Bake for ~30 minutes, or until lightly browned and a knife comes out clean

Ganache

Make ganache while cake is in oven

Chop up the chocolate, coarsely, and prepare extra-strong coffee

Slice up your butter and set aside

Now set up your double boiler; bring water to a simmer in medium pot over low-medium heat

Place heat-proof bowl of chocolate over the pot

Pour the coffee over your chocolate

Continuously stir until chocolate is melted and smooth

Remove bowl from heat and whisk in the butter until creamy

Then allow ganache to cool, stirring occasionally

Ganache is ready when the mixture gets nice and thick

Build Your Cake

Run a knife along the edges of each layer to loosen cake from the pans

Take your serving platter and put it over your bottom cake layer

Hold pan and platter together as you turn over the pan; the cake layer should come right out

Remove parchment paper from cake

Put just under a cup of ganache onto the cake layer

Use a large spatula to spread the ganache, covering the entire layer

Use the same methodology to flip your top layer onto a separate plate

Then place layer gently over frosted cake

To ice the rest of the cake, pour generous amounts of ganache on top and then spread

Run the spatula gently around the sides and top of the cake to smooth out the edges

Store cake at room temperature for up to three days

Do you have any new favorite recipes?

Read Full Post »

Older Posts »